If you are unfamiliar with XBMC, it provides a slick interface to connect to your TV, through which you can access all kinds of media stored on network hard disks. I tend to use mine fo viewing photos on my TV, and accessing centrally recorded TV programmes from my MYTHTV viewer. Anyway, whilst an XBOX + XBMC works well, it cannot play high definition content, not to mention the fact it looks a bit ugly, and the fan makes a lot of noise whilst running. So, when I saw Acer had recently released a tiny, cheap desktop (or 'Nettop') PC called the Aspire Revo, this looked like the perfect upgrade for my XBMC system.
I won't go into detail about the Revo's spec here - many other sites have that well covered already. I purchased mine from eBuyer in the UK - the linux version, with 1Gb RAM and 160Gb hard-drive, for the bargain price of £160 including free delivery. I then set to installing this with XBMC, which in the most part was very simple, but I did struggle to get the WLAN working. Therefore, I thought it might be useful to note my installation procedure here, in case anyone else can benefit from the experience.
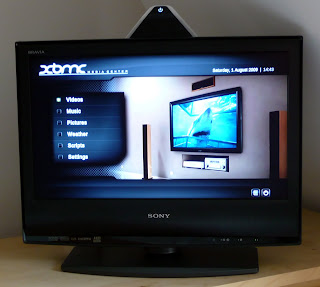
Before we talk software, here are a couple of shots of the physical installation using the supplied mounting kit. Neat huh?

Right, now for how I went about installing this. Proceed as follows:
- Physically install the Revo - connect HDMI, power, keyboard, and in my case, a Windows MCE remote control USB IR adapter.
- Switch on the power, and hit DEL to get to the BIOS settings. Disable Revoboot as this is not required.
- Next, download XBMC Live custom build including the latest NVIDIA ION drivers following the instructions in item 3 of this post.
- I burned the ISO to a CD ROM, then plugged-in my USB CD drive to the Revo, inserted the CD, and rebooted.
- Hit F12 to get the Revo boot menu. Select the CD ROM and proceed.
- Follow the instructions to install XBMC Live to the hard disk - pretty straight forward. Then reboot.
- After about 20 seconds of boot time, I was greeted with the familiar XBMC welcome screen. Remote control working right out of the box. Before configuring XBMC itself, some system-level tasks are required first.
- Since the WLAN does not work out of the box, I first install SSH from the command line by hitting CTRL+ALT+F2, logging in as XBMC user, and then typing: sudo apt-get install ssh
- If you like, you can continue to use this command line to complete the set-up, but I found the text was cropped by my Sony TV, so instead I plugged-in a network cable into my router, and SSH'd from my main desktop PC using PuTTY.
- Next, I performed a system update with sudo apt-get update and sudo apt-get upgrade. I then rebooted after this.
- Next, SSH back into the box and install more essential packages for the WLAN to work: sudo apt-get install ntp wpasupplicant wireless-tools. I included NTP so the Revo can keep accurate time.
- After another reboot, time to set-up the WLAN. My home network uses a hidden SSID which, to this day, I have not managed to get the Revo to connect to. Having now unhidden my SSID it works, so I still need to figure out how to get the Revo to connect to an unhidden network. Not urgent though. Additonally, I have WPA / WPA2 security enabled. First thing to do is sudo vi /etc/network/interfaces and make your file look just like mine:
# Used by ifup(8) and ifdown(8). See the interfaces(5) manpage or
# /usr/share/doc/ifupdown/examples for more information.
auto lo
iface lo inet loopback
auto eth0
iface eth0 inet dhcp
#iface eth0 inet static
#address 192.168.0.100
#netmask 255.255.255.0
#gateway 192.168.0.1
auto wlan0
iface wlan0 inet dhcp
pre-up wpa_supplicant -B -Dwext -iwlan0 -c/etc/wpa_supplicant.conf
post-down killall -q wpa_supplicant
- Next, you need to configure wpa_supplicant. Two pieces of information you need are: a) your SSID, and b) your WLAN password. In my example below, I will use your_essid
and your_ascii_key to replace my actual values used. A good reference for this part can be found here. First thing then is to get your HEX password by using the following command:
wpa_passphrase your_essid your_ascii_key
- Which will give you, as an example, this output in a terminal:
network={
ssid="test"
#psk="12345678"
psk=fe727aa8b64ac9b3f54c72432da14faed933ea511ecab1 5bbc6c52e7522f709a
}
Next, copy this, and then sudo vi /etc/wpa_supplicant.conf and make the file look like this:
ctrl_interface=/var/run/wpa_supplicant
ap_scan=1
network={
ssid="your_essid
proto=WPA RSN
key_mgmt=WPA-PSK
pairwise=CCMP TKIP
group=CCMP TKIP
#psk="your_ascii_key
psk=fe727aa8b64ac9b3f54c72432da14faed933ea511ecab1 5bbc6c52e7522f709a
}
- Save this file and you are ready to test the connection. If all has gone well, running the following command will confirm you can connect via WLAN now: sudo wpa_supplicant -iwlan0 -c/etc/wpa_supplicant.conf -Dwext -dd
- Hit CTRL-C to quit wpa_supplicant. You can now manually bring up the connection with sudo ifup wlan0, or just reboot.
And that's it for getting the WLAN working. The final base configuration required to ensure XBMC can play everything correctly is as follows:
- Go into XBMC's settings, and select the following:
- VIDEO: Setting > Video > Play:Set Render to - VDPAU
AUDIO: Settings > system > audio hardware > Audio output (digital) - DigitalAudio output device - plug:hdmi (if you just use hdmi here, your music files will play about 10% faster than they should!) - Passthrough output device - hdmi
- Downmix multichannel audio to stereo - ON
The rest of the XBMC configuration is up to you, but having done the above, you have a solid, fully working system to build on.
First impressions of the Revo are excellent, and it appears to be perfectly suited to the low-cost media centre application here. I hope this information was useful - thanks for reading.
Nick.
Great Post Nick, followed it word for word, and it worked out a treat!
ReplyDeleteOne thing you may be able to help with, I think the MP3 playback is fast, and if I set the Audio output to plug:hdmi, I get a buzzing noise of film playback so have to revert the setting to hdmi only. Any ideas on this?
Cheers
Russ
Hi Russ. Thanks for the feedback - I'm glad this worked for you. I have also heard the buzzing issue for movies encoded in Handbrake in MKV format. However, I found that M4V format files didn't have the issue, so I have used that instead. Might be worth trying that.
ReplyDeleteHi there. Can I get Wlan working from another machine that isn't linux? I only have windows! I'd dearly love to get wlan, so i can scrape all the film and music info etc :)
ReplyDeleteHi P - This tutorial only covered the Linux installation on the Aspire. I don't have a Windows based Revo unfortunately.
ReplyDeleteHi again. Sorry, I really should have worded that a lot better! I'm not trying to get windows on the revo- on the contrary in fact, im trying to do exactly what you did. Correct me if im wrong though - you used ANOTHER linux machine to help install linux on the revo yes? With this ssh (which i assume is like ftp or something)? I dont have another linux machine, only a windows machine and xbmc linux on the revo. So I was wondering if you A) knew how I could do it without another linux machine and/or B) knew what I had to do if I just plugged my revo into the router using the ethernet cable and went from there? Sorry if this is too much to ask - feel free to say no!
ReplyDeleteHi P. No problem. Just go to http://www.chiark.greenend.org.uk/~sgtatham/putty/ and download the PuTTY client for Windows. This will allow you to then SSH into your Revo.
ReplyDeleteThank you so much. So am I to assume that if I can plug my revo into my router using ethernet (and assuming the text is legible on screen) I don't have to use SSH at all? I can just do all those commands that begin with sudo etc etc at the revo?
ReplyDeleteP - you are correct.
ReplyDeleteThanks a lot for the information. I trust Acer desktops. My father purchased the Acer Aspire M3800-U3802A. It does not have an innovative design. The performance delivered is average. The Acer is quiet slow compared to Gateway.The Acer comes packed with a device-friendly FireWire 400. If your budget is not very high, this desktop is worth buying, it is an averagage desktop. For more details refer Acer Aspire desktop
ReplyDeleteThanks again for your help. I shall try this guide now. Only problem for me is I simply can't get the ram upgraded. I have 2 sticks of 1gb mem (ddr2 800 - thats what my revo actually came with inside) but they only work on their own, I can never POST with them together (constant beep)!
ReplyDeleteOh well!
I realise that this isn't my personal help blog (honest!) but after following your instructions to the letter, I still can't get wlan working properly. I can now select it in the xmbc settings, but I can't change any of its settings like dhcp, psk etc and when i exit that menu, it defaults back to eth0!
ReplyDeleteI'm terrible at this.
Hi P. I'm not sure if I can help much further, but you should not need to alter any of the network settings in XBMC itself. My installation guide hard-codes the wireless settings in the OS itself, by-passing the need to then configure the networking in XBMC.
ReplyDeleteThe one point I must stress is that my instructions will NOT work if your network's SSID is hidden in your wireless router. The router must be transmitting the SSID, otherwise the Revo will not connect.
P - oh, and don't bother upgrading the RAM if you are just using the Revo for XBMC use. Mine works perfectly with 1Gb RAM.
ReplyDeleteI might not bother you know! Yeah I unhid my ssid as per your original instructions, sadly to no avail. I must be doing something right though, as when I look at the network settings in xbmc I see it has set the DNS to be the ip of my router, so it must have noticed it!
ReplyDeleteGreat guide, Nick!
ReplyDeleteAfter fighting with XBMC+Ubuntu, then XBMC+Win7, then Win7MC, all on my Revo, I finally tried this and it worked flawlessly first-try.
Kudos!!!
I disagree about not upgrading to the additional gig of ram. The revo would not play 1080p content in Windows 7 (MPC-HC) or XMBC Live (VDPAU) without the additional gig of ram and the video memory set to 512MB.
ReplyDeleteOut of the box, the device would play 720p fine, but 1080p only worked with the additional gig of ram.
Has anyone tried XBMC Live 9.11 on their Revo?
ReplyDeleteI tried to install it via USB, but the installer's partitioner failed every time I tried to install on the HDD. :(
I'm running XBMC Live 9.11 (repack) on my Revo. The install process didn't work the first go around (from USB), so I had to restart the installer to get it running. I should note that I had upgraded my Windows install from XP to 7 though so my partitions were different than what originally came on the box.
ReplyDeleteHi Darin - I installed XBMC Live from my USB CDROM just the other day and using almost the same procedure as for 9.04 it went on fine. I'll add a new post to the blog with my install notes in the next day or two.
ReplyDelete...and of course, I meant XBMC Live 9.11...!
ReplyDeletewpa_ap_scan 1 is for a broadcast ESSID
ReplyDeletewpa_ap_scan 2 is for a hidden ESSID
this comes from the article you linked to earlier in the thread - could this cure your hidden network ails?
http://ubuntuforums.org/showthread.php?t=202834
Thanks Barrie. I'm sure I tried this (unsuccessfully) first time around, but I will give it another shot when I get a moment and will report back.
ReplyDeleteI did as you mentioned all seemed OK till i rebooted and now stuck on starting up ....
ReplyDeleteHi Ben
ReplyDeleteI did notice when recently re-installing my XBMC Live 9.11 system that after performing the apt-get update; apt-get upgrade, the system would not boot any more. I just got a very small error window appear in the centre of my screen - too small to read what it said! Anyway, for now I recommend you re-install, but do not perform the online update from the command line. All then should hopefully be well.
Ben/Nick-
ReplyDeleteI ran into a similar problem where XBMC-Live would boot up with a small error window centered that was very hard to read. This error was basically saying that there was a problem with the graphics driver. Similar to your situation, this error popped up after I upgraded to the latest XBMC-Live SVN (via apt-get upgrade) so I could install the latest Aeon65 skin.
The first time I had the issue, I just completed re-installed. The second time around I wanted to figure out what happened and fix it. I've posted some simple instructions on my blog which show how to fix the NVIDIA driver error. (aka. the small centered box error).
Josh - many thanks for the tip - this worked. I can confirm that, after performing an apt-get update; apt-get upgrade, this results in XBMC not booting, but instead displaying a very small error window instead. This can be solved by SSHing into the Revo and issuing the following commands:
ReplyDeletesudo stop xbmc-live
sudo nvidia-installer --update -a -s -f
sudo start xbmc-live
Thanks again.
Great article Nick. I am looking forward to using this. I have one question, however.
ReplyDeleteWhat wireless card are you using to get wireless?
Thank you very much.
Hi. The Revo has wireless built-in, so I'm just using that!
ReplyDeleteOh. Thank you! I looked at a Revo that didn't have wireless built in. I'll have to get one that does.
ReplyDeleteOnce again, great article and thank you very much!
Hi Nick,
ReplyDeleteThanks for posting up this guide it's exactly what I want to do.
Which IR adapter did you purchase? I'm having trouble finding one on eBuyer et al.
For what it's worth I also have a Logitech Harmony series remote so I'm hoping I can programme that to control the Revo/XBMC.
Thanks,
Michael
Nick, does your method replace the OS (in my case Win 7) that comes on the box? Or does it dual boot?
ReplyDeleteHi Michael - thanks for the feedback. I use the following media center remote control from Maplin Electronics in the UK:
ReplyDeletehttp://www.maplin.co.uk/Module.aspx?ModuleNo=218643
Works with no configuration - just plug-in the USB IR receiver and you're away!
Nick
Hi sygyzy - you are correct, this procedure will format and re-partition your hard drive and therefore replaces Windows 7 if that's what you have currenty installed. So proceed with caution!
ReplyDeleteNick
All - don't miss my updated guide, with XBMC Live 9.11, here:
ReplyDeletehttp://morningbeat.blogspot.com/2010/01/xbmc-911-on-acer-aspire-revo.html
Thanks for the quick response Nick, I nipped out to Maplin yesterday and purchased the remote you mentioned. The Revo just arrived so I'm all set!
ReplyDeleteThanks for the link to the other post I hadn't spotted that.
I instead did a full Ubuntu 10.04 install on my HD (not the XBMC Live) and then installed XBMC). I added the NVIDIA driver. My networking, display, etc. all works great.
ReplyDeleteMy problem is I have tearing in the middle of the screen when watching a movie. Even smaller 800mb or so XviD movies. I didn't have this when I had 9.04 installed before. Not sure what option I missed or if its a display driver deal.
ALSO, I have a 9GB 1080p .mkv file which XBMC on my Revo will not even play (I have the 4gb revo) properly. It frames a lot, audio stops, it isnt watchable. I wonder why?
Hi AMG. I've no clues what your problems might be caused by. I suggest you try the Ubuntu forums here: http://www.ubuntu.com/support/community/webforums
ReplyDeleteJust a quick note for people having issues with getting wireless working with the Acer Revo 1600. I have two of these beasties, one has a Atheros 5891 wireless card. The other has a RaLink 3090. The tutorial above works for the Atheros wireless but not for the RaLink. If you look at the bottom side of the device you will see the Wlan type. To configure the Ralink you must do the following:
ReplyDeletesudo apt-get install python-software-properties
sudo add-apt-repository ppa:markus-tisoft/rt3090
sudo apt-get install rt3090-dkms
This will configure a private ppa to get the latest stable ralink 3090 module and build it for your system. Reboot now.
Strangely the interface will not be called wlan0 but rather ra0. After rebooting. Do
iwconfig
To confirm that it shows up.
You will have to modify the /etc/network/interfaces file to reference ra0 instead of wlan0.
auto lo
iface lo inet loopback
auto eth0
iface eth0 inet dhcp
auto ra0
iface ra0 inet dhcp
pre-up wpa_supplicant -B -Dwext -ira0 -c/etc/wpa_supplicant.conf
post-down killall -q wpa_supplicant
The wpa_supplicant.conf file can stay the same.
Then you can run:
sudo wpa_supplicant -ira0 -c/etc/wpa_supplicant.conf -Dwext -dd
I had to manually delete the following:
sudo rm /var/run/wpa_supplicant/ra0
and reboot to get it going.
After reboot do an ifconfig to see the ipaddress of your ra0 interface.
I hope this helps somebody else.
My system is up and running but the movies keep stopping so that the buffer can reload about every minute. Is there some setting somewhere that I am missing? I am using an NAS server with Powerline Ethernet. It works fine for streaming video over the internet but not with the server.
ReplyDeleteSteven - I had the same issue, using HomePlugs. I was able to resolve the problem by moving the HomePlug to a different socket in the same room. That sorted the problem.
ReplyDeleteFYI - I've recently moved and the new house must have much better wiring as I'm now getting better speeds with the HomePlugs. Another option is to see if you can upgrade the HomePlugs if you're not using the fastest versions.