STS-129 Ascent Video Highlights from mike interbartolo on Vimeo.
Sunday, November 29, 2009
Amazing Space Shuttle launch footage.
Long time no post, but having just discovered this amazing Space Shuttle launch montage, I had to share it. Sit back for 12 minutes and be amazed and inspired...
Sunday, September 13, 2009
Sony MHS-PM1 - a great take-anywhere camera / HD camcorder.
I recently saw Amazon selling the Sony MHS-PM1 camera cheap for around £140, and thought this might be an ideal camera to carry anywhere, for those impromptu photographic moments. So I ordered one this week (in tasteful orange), and can report it is an impressive device.


Already owning a small Lumix compact, plus an FZ18 for serious photo taking, I wanted something which could slip into a jeans pocket, and could be pulled-out quickly for immediate shooting. The Sony is good enough for this, and here are the pros and cons as I see it:
Pros:
- Small, and lightweight.
- Removable battery and memory card, a plus in my opinion over the rival Flip cameras.
- Quick and easy to use. Frame your shot on the LCD screen, then either press 'photo' to take a 5 megapixel still, or 'movie' to start shooting digital video.
- Up to 1080p video resolution.
- Fixed focus lens, which eliminates focus hunting issues which traditional camcorders can suffer from.
Cons:
- The glossy LCD can be difficult to see in bright sunlight.
- The fixed focus lens can limit artistic shots, but then this camera is not designed for that kind of photography.
- No optical zoom, and the digital zoom is quite jerky. I can live without these though.
- Sony still sticking to their expensive Memorystick card format.
- Plastic enclosure feels a little cheap. Had a metal case been used this would have been a hugely desirable camera.
Here are a couple of photo and video examples taken yesterday. I'm really pleased with this camera, and plan to keep it tucked in my pocket from now on. Some reviews report the low-light performance might suffer a bit, but for this price, I'm not worried. £140 for a pocket-sized, HD camcorder and digital stills camera? A bargain!
This video clip was shot at 1080p, and trust me when I say the quality is very good when viewed on my Bravia TV!
Thursday, September 3, 2009
My perfect Android development environment.
Hi Everyone
In case you spotted my previous post, I'm dabbling right now with software development on the Android phone platform. To do this, I've set-up a dedicated development system on my Acer 4520 laptop, and below is my installation guide, in case anyone wants to do something similar.
The specification for the system is as follows:
Screenshot of the finished environment:

In case you spotted my previous post, I'm dabbling right now with software development on the Android phone platform. To do this, I've set-up a dedicated development system on my Acer 4520 laptop, and below is my installation guide, in case anyone wants to do something similar.
The specification for the system is as follows:
- Kubuntu 9.04 running KDE 4.2 (I wanted a KDE environment specifically for this system, mainly for the looks!)
- Latest Eclipse Galileo development environment.
- Latest Android 1.5 SDK
Here's the installation sequence I used:
Screenshot of the finished environment:
Base installation
- Clean installation of 32 bit Kubuntu 9.04. 32 bit required for Android IDE compatibility.
- Boot into desktop and enable wireless networking.
- Enter the WPA password twice when prompted.
- Just enter a blank password for the KDE Wallet.
- KDE might crash once networking has been enabled. Reboot at this point, and network will connect when you log-in again.
- Install all updates using System Settings -> Add & Remove software.
- Reboot
- Next install NVIDIA v180 driver using Hardware Drivers tool. Ignore the proprietary Atheros driver option.
- Reboot
Packages to install
- Using command line to install these packages in order for the Java license to be displayed correctly:
- sudo apt-get install flashplugin-installer sun-java6-jdk
- Verify Java version with:
- java -version
- javac -version
Installing Android development environment
Reference: http://developer.android.com/sdk/1.5_r3/installing.html
- Download eclipse Galileo and Android SDK 1.5. Then install as follows:
- tar -xvf eclipse-jee-galileo-linux-gtk.tar.gz
- unzip android-sdk-linux_x86-1.5_r3.zip
- sudo mv eclipse /usr/local/bin
- sudo mv android-sdk-linux_x86-1.5_r3 /usr/local/bin
- Then add Eclipse manually to the KDE start menu:
- Name: Eclipse
- Location: /usr/local/bin/eclipse/eclipse
- Description: Java IDE
- Icon: Search for 'Eclipse'
- Start Eclipse, select the default workbench location, then close the Welcome tab on launch.
- Then select Help -> Check for updates.
Install all updates then restart Eclipse. - Now set-up the Android plugin in Eclipse with:
- Help > Install new software....
- Click Add Site...
- Enter the Location: https://dl-ssl.google.com/android/eclipse/
- Select the checkbox next to Developer Tools and click Install...
- On the subsequent Install window, "Android DDMS" and "Android Development Tools" should both be checked. Click Next.
- Read and accept the license agreement, then click Finish.
- Restart Eclipse.
- Now modify your Eclipse preferences to point to the Android SDK directory:
- Select Window > Preferences... to open the Preferences panel.
- Select Android from the left panel.
- For the SDK Location in the main panel, click Browse... and locate /usr/local/bin/android-sdk-linux_x86-1.5_r3.
- Click Apply, then OK.
- Disable Google usage stats.
The Android environment is now ready to use. All that is left is to fine-tune the desktop to my preferences, and we're done.
Configure Konqueror
- Install Adobe flash player: Having installed the flash plugin in the earlier steps, launch Konqueror and do the following:
- Settings -> Configure Konqueror
- Web Browsing -> Plugins
- Plugins tab -> Scan for Plugins
- Flash plugin should then appear in the list.
- Hit 'OK' to confirm, then test at http://www.bbc.co.uk/
- Settings -> Configure Konqueror
- Set homepage as: /usr/local/bin/android-sdk-linux_x86-1.5_r3/documentation.html
- Set Konqueror to load homepage on start-up.
KDE desktop configuration
- Right-click workspaces -> Configure Desktops. Increase workspaces from 2 to 4.
- System Settings -> Appearance -> Fonts. Change font DPI to 96.
- Add the following apps to Start menu Favourites: Applications -> System -> Terminal; Development -> Eclipse
- System Settings -> Notifications. Event Source -> KDE System Notifications. Remove sound from Logout and Login events.
- Go into sound mixer and maximise Front and PCM sliders (or there will be no sound in Flash Player).
- Set wallpaper.
- Lock widgets.
Done!
Saturday, August 1, 2009
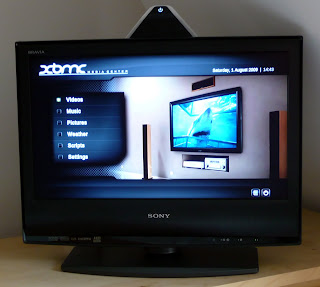
Acer Aspire Revo - the perfect high definition XBMC media center.
I'm a big fan of home media streaming. Storing all of your photos, music, and video files on a single server, and then accessing these from your PCs and TVs around the house makes a lot of sense to me. For many years now, I've run such a system at home, with a single large central server, and a number of clients of different kinds. My two favourites are my Logitech Squeezebox which is the perfect on-line music player, and a modified old XBOX running the XBMC media center.
If you are unfamiliar with XBMC, it provides a slick interface to connect to your TV, through which you can access all kinds of media stored on network hard disks. I tend to use mine fo viewing photos on my TV, and accessing centrally recorded TV programmes from my MYTHTV viewer. Anyway, whilst an XBOX + XBMC works well, it cannot play high definition content, not to mention the fact it looks a bit ugly, and the fan makes a lot of noise whilst running. So, when I saw Acer had recently released a tiny, cheap desktop (or 'Nettop') PC called the Aspire Revo, this looked like the perfect upgrade for my XBMC system.
I won't go into detail about the Revo's spec here - many other sites have that well covered already. I purchased mine from eBuyer in the UK - the linux version, with 1Gb RAM and 160Gb hard-drive, for the bargain price of £160 including free delivery. I then set to installing this with XBMC, which in the most part was very simple, but I did struggle to get the WLAN working. Therefore, I thought it might be useful to note my installation procedure here, in case anyone else can benefit from the experience.
Before we talk software, here are a couple of shots of the physical installation using the supplied mounting kit. Neat huh?
Right, now for how I went about installing this. Proceed as follows:
If you are unfamiliar with XBMC, it provides a slick interface to connect to your TV, through which you can access all kinds of media stored on network hard disks. I tend to use mine fo viewing photos on my TV, and accessing centrally recorded TV programmes from my MYTHTV viewer. Anyway, whilst an XBOX + XBMC works well, it cannot play high definition content, not to mention the fact it looks a bit ugly, and the fan makes a lot of noise whilst running. So, when I saw Acer had recently released a tiny, cheap desktop (or 'Nettop') PC called the Aspire Revo, this looked like the perfect upgrade for my XBMC system.
I won't go into detail about the Revo's spec here - many other sites have that well covered already. I purchased mine from eBuyer in the UK - the linux version, with 1Gb RAM and 160Gb hard-drive, for the bargain price of £160 including free delivery. I then set to installing this with XBMC, which in the most part was very simple, but I did struggle to get the WLAN working. Therefore, I thought it might be useful to note my installation procedure here, in case anyone else can benefit from the experience.
Before we talk software, here are a couple of shots of the physical installation using the supplied mounting kit. Neat huh?

Right, now for how I went about installing this. Proceed as follows:
- Physically install the Revo - connect HDMI, power, keyboard, and in my case, a Windows MCE remote control USB IR adapter.
- Switch on the power, and hit DEL to get to the BIOS settings. Disable Revoboot as this is not required.
- Next, download XBMC Live custom build including the latest NVIDIA ION drivers following the instructions in item 3 of this post.
- I burned the ISO to a CD ROM, then plugged-in my USB CD drive to the Revo, inserted the CD, and rebooted.
- Hit F12 to get the Revo boot menu. Select the CD ROM and proceed.
- Follow the instructions to install XBMC Live to the hard disk - pretty straight forward. Then reboot.
- After about 20 seconds of boot time, I was greeted with the familiar XBMC welcome screen. Remote control working right out of the box. Before configuring XBMC itself, some system-level tasks are required first.
- Since the WLAN does not work out of the box, I first install SSH from the command line by hitting CTRL+ALT+F2, logging in as XBMC user, and then typing: sudo apt-get install ssh
- If you like, you can continue to use this command line to complete the set-up, but I found the text was cropped by my Sony TV, so instead I plugged-in a network cable into my router, and SSH'd from my main desktop PC using PuTTY.
- Next, I performed a system update with sudo apt-get update and sudo apt-get upgrade. I then rebooted after this.
- Next, SSH back into the box and install more essential packages for the WLAN to work: sudo apt-get install ntp wpasupplicant wireless-tools. I included NTP so the Revo can keep accurate time.
- After another reboot, time to set-up the WLAN. My home network uses a hidden SSID which, to this day, I have not managed to get the Revo to connect to. Having now unhidden my SSID it works, so I still need to figure out how to get the Revo to connect to an unhidden network. Not urgent though. Additonally, I have WPA / WPA2 security enabled. First thing to do is sudo vi /etc/network/interfaces and make your file look just like mine:
# Used by ifup(8) and ifdown(8). See the interfaces(5) manpage or
# /usr/share/doc/ifupdown/examples for more information.
auto lo
iface lo inet loopback
auto eth0
iface eth0 inet dhcp
#iface eth0 inet static
#address 192.168.0.100
#netmask 255.255.255.0
#gateway 192.168.0.1
auto wlan0
iface wlan0 inet dhcp
pre-up wpa_supplicant -B -Dwext -iwlan0 -c/etc/wpa_supplicant.conf
post-down killall -q wpa_supplicant
- Next, you need to configure wpa_supplicant. Two pieces of information you need are: a) your SSID, and b) your WLAN password. In my example below, I will use your_essid
and your_ascii_key to replace my actual values used. A good reference for this part can be found here. First thing then is to get your HEX password by using the following command:
wpa_passphrase your_essid your_ascii_key
- Which will give you, as an example, this output in a terminal:
network={
ssid="test"
#psk="12345678"
psk=fe727aa8b64ac9b3f54c72432da14faed933ea511ecab1 5bbc6c52e7522f709a
}
Next, copy this, and then sudo vi /etc/wpa_supplicant.conf and make the file look like this:
ctrl_interface=/var/run/wpa_supplicant
ap_scan=1
network={
ssid="your_essid
proto=WPA RSN
key_mgmt=WPA-PSK
pairwise=CCMP TKIP
group=CCMP TKIP
#psk="your_ascii_key
psk=fe727aa8b64ac9b3f54c72432da14faed933ea511ecab1 5bbc6c52e7522f709a
}
- Save this file and you are ready to test the connection. If all has gone well, running the following command will confirm you can connect via WLAN now: sudo wpa_supplicant -iwlan0 -c/etc/wpa_supplicant.conf -Dwext -dd
- Hit CTRL-C to quit wpa_supplicant. You can now manually bring up the connection with sudo ifup wlan0, or just reboot.
And that's it for getting the WLAN working. The final base configuration required to ensure XBMC can play everything correctly is as follows:
- Go into XBMC's settings, and select the following:
- VIDEO: Setting > Video > Play:Set Render to - VDPAU
AUDIO: Settings > system > audio hardware > Audio output (digital) - DigitalAudio output device - plug:hdmi (if you just use hdmi here, your music files will play about 10% faster than they should!) - Passthrough output device - hdmi
- Downmix multichannel audio to stereo - ON
The rest of the XBMC configuration is up to you, but having done the above, you have a solid, fully working system to build on.
First impressions of the Revo are excellent, and it appears to be perfectly suited to the low-cost media centre application here. I hope this information was useful - thanks for reading.
Nick.
Sunday, May 31, 2009
Acer Aspire One + OpenSolaris 2009.6 = a great combination.
It's been rather too long since my last post, so here's another quick MS Windows-alternative related update.
I've been running an excellent Acer Aspire One since January, which I've tried a number of Linux distributions on. I pretty much settled for Ubuntu 9.04 Netbook Remix, but decided last week to try OpenSolaris 2009.06 preview (build 111a). I've always been a fan of OpenSolaris' beautiful Gnome themed desktop, plus the feeling that it's a fully integrated Desktop. However, it's always fallen short, for me at least, on hardware support. Even the most recent official release will not even recognise the network card on my desktop PC - crazy!
Well, a huge amount of work must have gone into the latest builds of OpenSolaris, as, out of the box, everything works perfectly on my Aspire One, and even though I'm running a 'preview' release, the desktop is extremely stable, and very attractive. I'll be installing the official release when it comes out in June, and thoroughly recommend it to anyone wanting an attractive Ubuntu alternative.

Thanks for reading,
Nick
I've been running an excellent Acer Aspire One since January, which I've tried a number of Linux distributions on. I pretty much settled for Ubuntu 9.04 Netbook Remix, but decided last week to try OpenSolaris 2009.06 preview (build 111a). I've always been a fan of OpenSolaris' beautiful Gnome themed desktop, plus the feeling that it's a fully integrated Desktop. However, it's always fallen short, for me at least, on hardware support. Even the most recent official release will not even recognise the network card on my desktop PC - crazy!
Well, a huge amount of work must have gone into the latest builds of OpenSolaris, as, out of the box, everything works perfectly on my Aspire One, and even though I'm running a 'preview' release, the desktop is extremely stable, and very attractive. I'll be installing the official release when it comes out in June, and thoroughly recommend it to anyone wanting an attractive Ubuntu alternative.
Thanks for reading,
Nick
Sunday, March 15, 2009
B&W digital photography
I've been enjoying the BBC's 'Genius of Photography' series currently airing in the UK. Yesterday's covered some fantastic B&W photographs from the mid 20th century, which inspired me to try to get some similar effects from my modern-day Lumix FZ-28.
Previous attempts to achieve pleasing digital B&W shots have been disappointing. Quite often because the technique has been to shoot a conventional colour shot, desaturate it in Photoshop, and then try to add some contrast and grain to achieve the vintage B&W look, without destroying too much detail. Last night I stumbled upon the following article by Tony Karp which gave me some clues as to how to configure my camera to take a good B&W shot directly, with little post-processing required:
http://www.tlc-systems.com/artzen2-0093.htm
I configured my Lumix with settings I believe are close to what Tony was using, and here are my initial results:
http://picasaweb.google.com/mobile.harvey/TwickenhamMarch2009#
OK - not the most exciting subject matter, but I'm very pleased with the contrast and texture of these shots. Certainly the best B&W results I've ever achieved on a digital camera. I'll be taking more in the near future for sure!
Thanks for reading,
Nick.
Saturday, March 7, 2009
Time passes quickly...
...not just since my last Blog, but also since buying my first ever album, back in 1985 (or was it '86?) - Paul Hardcastle's, self-named LP.
I remember this having a huge influence on my at the time - from the revolutionary Synclavier sampling & time stretching (put to amazing effect on the classic track '19'), to the high-tech circuit board front cover. I pretty much wore out the cassette (chrome tape, with Dolby B if I remember rightly!) listening to this over and over again (it was my only album at the time after all)!
25 years, and almost a 1000 CD purchases later this album is still not available to buy on CD - something I've never understood. So, today when I found it for MP3 download at Amazon I couldn't flex my Amex fast enough. OK - ideally I'd like a lossless FLAC format, but listening to the album now as I type this, the quality is good enough, and so much better than the original cassette!
Finally, Paul Hardcastle inspired me to want to become an electronic music producer. Not something I ever did professionally, but I dabbled with various software on my Spectrum (yes, really) Amiga, and later Windows PCs. This week I've decided to build a new mini studio, based around my Vista laptop, an M-Audio Oxygen 8 V2 keyboard, and Cakewalk Sonar Studio 8. The Sonar software is still on its way from Amazon, but the rest is here ready to go. If I can bash out anything good, I might put it online - you have been warned!
Thanks for reading,
Nick.
Subscribe to:
Posts (Atom)